



Quick answer. Choose an aluminum extrusion profile for the span, load, and space your frame needs. Then match each bracket, T-slot nut, and screw to the actual profile drawing and joint. On a 2020 profile, the outside dimensions are 20 × 20 mm. The slot opening, nut shape, and screw thread are separate dimensions to check.
What are aluminum extrusion profiles?
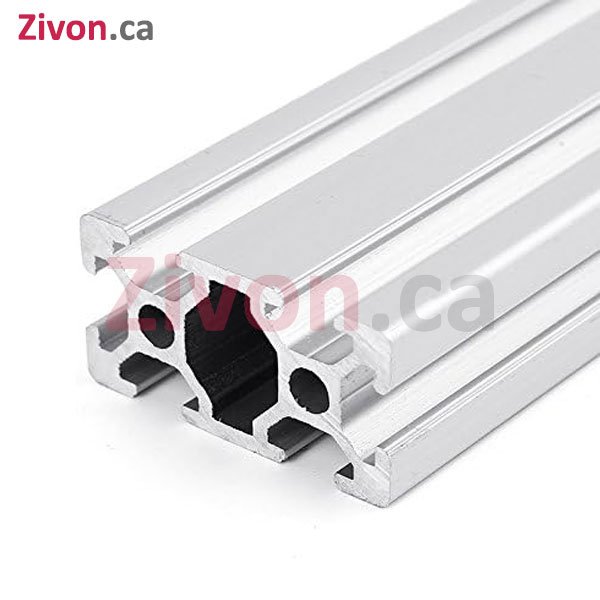
An extrusion is made by pressing aluminum through a shaped die. In a framing profile, channels along the faces let you position compatible hardware where you need it. Bolted joints make it possible to reposition mounts or reuse the profiles in another build. Anodized finishes are common on visible frames and equipment enclosures.
How to choose an aluminum extrusion profile
2020 vs. 2040 extrusion
| Profile | Outside dimensions | Where to consider it | What to verify |
|---|---|---|---|
| 2020 | 20 × 20 mm | Compact frames, small fixtures, and enclosure members where the span and loads allow. | Clearance for brackets, fasteners, and panels. |
| 2040 | 20 × 40 mm | Crossmembers and other spans where extra depth can reduce bending. | Orientation of the deeper section, access to both slots on the wide face if applicable, and the bracket footprint. |
For a horizontal beam carrying a vertical load, orienting the 40 mm dimension vertically generally improves bending stiffness compared with laying the same 2040 profile flat. The actual deflection depends on span, load, support conditions, and the section properties of that profile. For machinery, workbenches, or loaded shelving, check those properties and the joint ratings before selecting a size. MISUMI’s guide to profile selection explains what to check.

T-slot vs. V-slot aluminum extrusion
Choose standard T-slot framing when the main job is fastening brackets, panels, or accessories. V-slot profiles have angled running faces for compatible V-wheels on a gantry. If you’re building a wheel-guided axis, choose the profile, wheels, and gantry plate as a system. Check the slot drawing before using a T-nut or bracket with a V-slot profile. Profiles with the same outside dimensions can have different slot openings, undercut shapes, and depths.


Aluminum extrusion hardware and how to match it
Corner brackets, joining plates, and connectors
- External 90° bracket: A practical choice for a frame corner with access to the screws from the outside. A gusseted bracket can help resist racking when the bracket and fasteners are rated for the load.
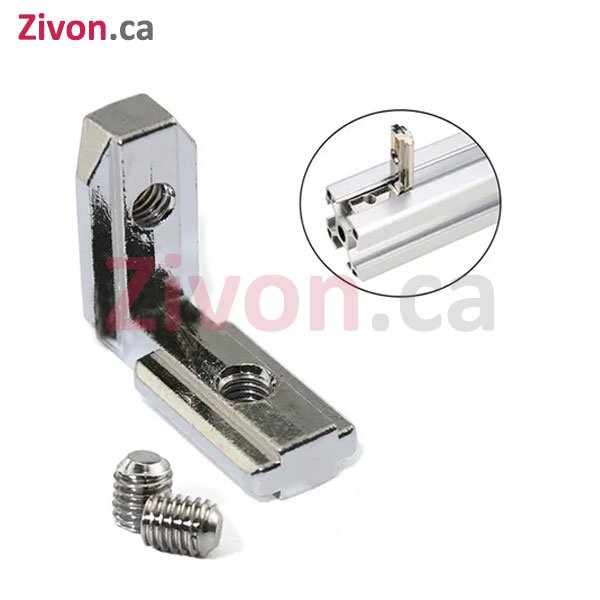
- Hidden L connector: Fits within the slots of compatible profiles and keeps exterior faces clear. Plan how the connector slides in and how you’ll reach its set screws.
- Joining plates and corner blocks: A flat L- or T-plate joins members on the same face. A suitable corner block can join members at a corner where the mounting layout fits. Check hole spacing, locating tabs, and clearance for panels or adjacent joints.

For more joint options, see Aluminum Profile Brackets: Types, Uses, and Selection.
Sliding, hammer-head, and roll-in T-nuts
A T-slot nut sits inside the channel and gives the screw a threaded anchor. Choose the nut body for the slot and the screw for the nut’s thread.
- Sliding T-nut: Insert it from an open profile end. Load these nuts before corner joints or end caps block access.
- Hammer-head or drop-in nut: Designed to enter a compatible slot from the face, then turn or seat under the slot lips. Check engagement before tightening.
- Roll-in spring nut: Rolls into a compatible slot from the face. A spring ball or leaf can hold the nut roughly in position while you start the screw, which helps on vertical members.


For a closer look at nut shapes and installation, see What Is a T-Nut and How Does It Work?.
Fasteners, end caps, feet, and panels
Match the screw’s thread diameter and pitch to the nut. Check the screw head style against the bracket hole or recess. Screw length needs enough usable thread engagement after passing through the bracket and any washer, with clearance so the screw doesn’t bottom out before clamping. Start with the hardware specified for the joint and follow its tightening instructions.
Choose end caps for the actual profile end shape. Check leveling feet or casters against the frame mount, thread, and load. For doors and panels, include room for hinges, the panel thickness, and the hardware’s travel. Plan when enclosed panels need to slide into a slot before the last frame member goes on. MISUMI’s panel mounting examples show several ways to attach panels.
Worked example for a simple rectangular frame
For a light-duty 400 × 300 mm outside rectangle built from 20 × 20 mm profile, run the two 400 mm members full length. Fit the two shorter members between them. Each short member is 260 mm long because the two long members take up 40 mm of the outside width. This example assumes square butt joints with no gap or connector offset.
- 2 × 400 mm and 2 × 260 mm lengths of 2020 extrusion.
- 4 compatible external 90° brackets, one per inside corner.
- 8 matching T-nuts and 8 screws if each bracket uses one fastener per leg. Count any washers and extra mounting hardware separately.
- Sketch the joints and mark which ends and slots must stay open for nuts or accessories.
- Insert any sliding nuts and loosely assemble the corners on a flat surface.
- Check that opposite sides have matching lengths and measure both diagonals. Adjust the corners until the diagonals match.
- Tighten to the hardware maker’s instructions, then recheck square before mounting panels or equipment.
If the frame will carry machinery or resist side loads, size the profile, joints, and bracing for those loads. A lightweight rectangle is a cut-list example. Machine frames and workbench frames may need different sections, connections, and bracing.
Buying checklist
- Measurements: Confirm outside dimensions, usable span, cut lengths, and how the ends meet.
- Profile and slot: Confirm cross-section, orientation, slot opening, and internal nut clearance from the drawings.
- Joints: Count connectors, check mounting holes and tool access, and plan bracing where needed.
- Fasteners: Match the nut shape to the slot, then match screw thread, head, length, and engagement to the joint. Check what comes with each part.
- Accessories: Check end caps, panel mounts, feet, and moving parts before closing off the profile ends.
Where to buy aluminum extrusion and hardware in Canada
Zivon ships from Canada. Use the categories below to find profiles and matching hardware. For delivery and local pickup details, see Shipping & Delivery.
- Aluminum Extrusion Profiles
- Corner Brackets and Connectors
- T-Slot Nuts and Screws
- Wheels, End Caps, and Accessories
- All Aluminum Extrusion and Accessories
Need help checking fit? Send Zivon your profile model or cross-section drawing and the hardware you’re trying to mount.
Frequently asked questions
Will any 2020 T-nut fit any 2020 aluminum extrusion?
2020 tells you the nominal outside dimensions. Compare the nut’s width and depth with the slot opening and undercut. Then check that your chosen screw matches the nut’s internal thread.
What size T-slot nut should I use?
Choose the nut body for the profile’s slot geometry. Choose the thread, such as M4 or M5, to suit the bracket and its matching screw. An M5 label describes the thread, so two M5 nuts can fit different slots.
Can I mix 2020 and 2040 profiles in the same frame?
Yes, where the joints fit. Check that the connector reaches the intended slots, mounting faces line up, and the selected nut fits each face. For a loaded frame, check the connection as well as each profile.
Do I need a T-slot nut if I’m fastening into the end of a profile?
A T-slot nut anchors a screw along the face of the profile. An end connection may instead use a tapped centre bore or a dedicated connector. Check the end drawing and the connector instructions before choosing or tapping hardware.
Can I add T-nuts after the frame is assembled?
Compatible drop-in or roll-in nuts can go into an accessible slot from the face. Sliding nuts need an open end, so fit them during assembly if that end will be covered.






Recent Comments